SQL Server 2016 and Management Studio Download and install
Ø SQL Server Installation Step
· First Click on SQL Server Setup
 |
| Image(1) |
Ø
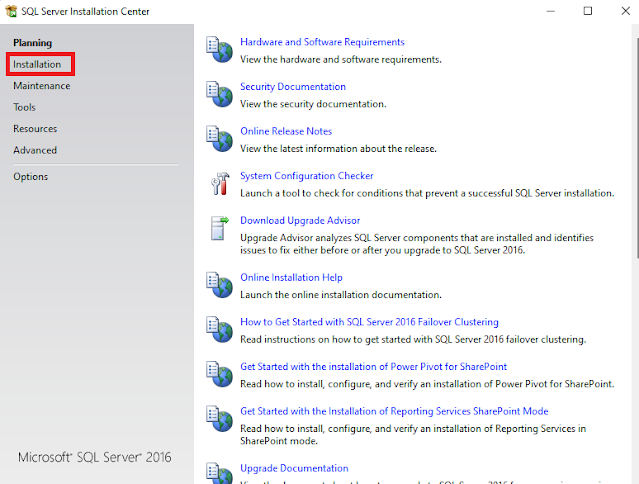
SQL Server Installation Center
·
Click on installation in
·
Then Showing on the right side – New SQL Server Alone-installation
Then click on this
 |
| Image(3) |
Ø
Specify a free Edition (Showing Here three
options) Check
·
Evaluation
·
Developer
·
Express
You Can
Select the Option in which type you want to use the SQL Server
I am
using it as an evaluation ….
Ø Enter the product Key
·
Showing you one box you can Enter your
product Key(this key Expire in one year)
· I am using as a free Edition Check image Image(4)……
 |
| Image(4) |
Ø
License Terms
·
Accept the License Terms then click on Next in
 |
| Image(5) |
Ø
Microsoft Update
·
If you want to Microsoft Updated then click Mark
on check box
 |
| Image(6) |
Ø
Install Rules
·
In this RuleRuleshowing this warning message it’s
have not any error
·
Warning – Microsoft dot net application security
·
Warning – one more warning like firewall
Simply
click on Next check
 |
| Image(7) |
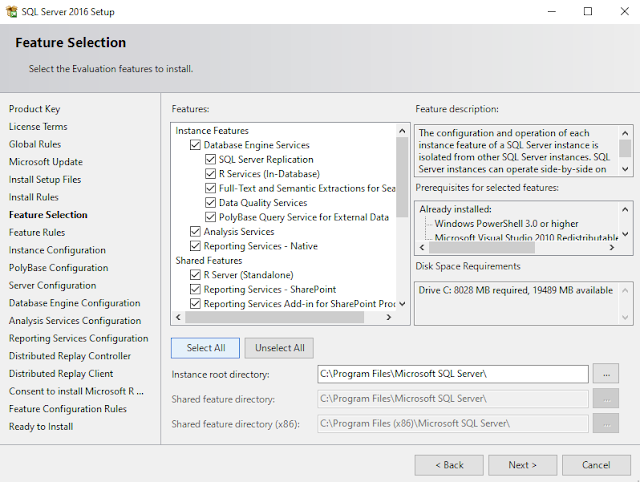
Ø Feature Selection
·
Which Feature you have selected need
·
You can select one by one if you have some
feature features
·
We can change the so installation Directory automatic
selected showing for you
·
I am selecting all then click to next check
 |
| Image(7) |
Ø
Feature Rules
·
Oracle
JRE 7 Update Failed If you selected all features then showing
·
You need to go back then unmark the Polybase query service check
 |
| Image(8) |
Feature Rules
· You need to go back then unmark the Polybase query service check
 |
| image(9) |
Ø Server Configuration
·
Service
Accounts
§ If you want to main service automatic
run then select automatic and want to open manually then select manual
§ Next service select collation check
 |
| image(10) |
Ø Server Configuration
·
Collation configuration
1. Click on Collation
2. Click on customize then showing all
list
3. Select Here Collation Latin1_General
4. Mark on Accent-Sensitive
Click on Service Account then click on Next ……check image(11)
 |
| image(11) |
|
Ø Database Engine Configuration ·
You
have the choice to select the Mode ·
Window authenticate Mode-you cannot set the password for user
in installation time, After installatiis on Done you can set the password for a
user ·
Mix Mode – You can use the SQL Server both mode SQL server mode and
window authenticate mode, in this time you have an option set the password foraa user ·
You
can Choose the password in mix mode Enter a password like Abc@124 ·
Click
on add Current User then click on Next See |
 |
| image(12) |
Ø Analysis Service configuration
·
Select
Multidimensional and data mining mode
· Click Current User then Next See image(13)
 |
| image(13) |
Ø Reporting service Configuration
·
Mark
on install and Configuration
Ø Reporting Service SharePoint
Integrated Mode
·
Install
Only click Next to see
 |
| image(14) |
Ø Distributed Replay Controller
·
Add
Current User click on Next see
 |
| image(15) |
Ø Distributed Replay Client
·
Enter
Controller name like system Name
·
Then
click on next see
 |
| image(16) |
Ø Installation Progress
·
If you Complete this installation then showing option for you Close
·
Then
click on close for close this setup see
 |
| image(17) |


1 Comments
well article provide to sql server 2014 and 2017
ReplyDelete